|
|
|
|
|
|
|
 |
 |
John's Hot Rods |
|
|
|
 |
 |
FFR '65 Roadster Build
|
|
|
March, 2001

I received my kit on 3/22/2001 and started to work on the build process. This first
weekend with my kit I managed to get to a point I had hoped to. My goal was to get
all the parts in the kit inventoried, get the kit unassembled from the partly assembled
shipping state, and get the chassis sanded, prepped and painted with two coats of POR15
paint. The chassis was actually not as bad as I had expected it to be. I spent
about 15 hours total on the prepping and painting. About 8 hours of that time were
with two people working. I guess you could count on about 23 hours if you were doing
it by yourself. The POR15 paint seemed to work ok for the chassis. I sanded
the chassis and wire brushed the weld areas first. Then I applied the Metal Prep
product that is recommended before the application of POR15. I used regular brushes
for the first coat and foam brushes for the second coat. I think the foam works
better. Overall, I am pleased with the result. I am mainly concerned with rust
prevention and a durable finish. If you are after a show quality finish you might
opt for the powder coating. It will be two weeks before I get to work on the kit
again. During this two week period I am going to try and round up some of the
remaining items I need for this first stage of the build. The next weekend I work on
it I hope to be able to get all the suspension work completed.
|
| April, 2001
(4-7-01) I completed the front suspension except for mounting the calipers, installed the
Flaming River manual steering rack, and installed the aluminum "F" panels, upper
firewall and floor pans this weekend. Overall, it went pretty good. The air
riviter I picked up from Harbour Freight is a life saver and definatly worth the 27$ I
paid for it on sale. I used GE Silicone II aluminum color silicone between the
panels and the chassis. I am waiting ;-( on the FFR rear control arms to arrive so
that I can begin work on the rear diff installation. I took this opportunity to
complete some of the cleaning and painting of the remaining used parts and cutting the
rear coil springs. I think I ended up using about 6 sawzall blades to get them cut.
(4-14-01) I initially installed
the rear diff since the FFR control arms finally came. Since I didn't go the donor
route I had to purchase some bolts from a fastener store. Lesson learned: grade 8.8
metric is actually comparable to grade 5 in standard. Now you know why I said
"initially installed". I have to get grade 10.9 bolts and swap them out
when they arrive. I could have just waited but I took the opportunity to fit
everything up and make sure it was ok. I picked up a new Vortex dry cell battery
from Advance Auto Parts and installed it also. Seems like a good battery and can be
mounted in any postition. It is actually made by Optima, whose batteries you will
see for sale in Summit Racing and Jeg's catalogs. I got it installed in the position
above the rear center section per FFR directions. I am not thrilled about the
location and the mounting hardware so later I may change or strengthen it. I will at
least make it part of my pre-outing checklist. I also installed the Mustang fuel
tank into the chassis. Given the way it looks, I think I will have to drop it back
out to place the bolts through that hold the quick jack bumpers. I don't think the
manual mentions it but it sure looks that way to me. To complete the weekend I began
to install the front footbox aluminium on both the driver's and passenger sides. I
left the upper footbox open on the driver's side since I still have a lot of work to do on
the pedal box.
(4-21-01) I continued to work on
the front aluminium some, ran the fuel and brake lines, removed the rear diff mounting
bolts, installed rear shocks, and mounted fuel pump and filter. The footbox
aluminium needed some work to get it to fit. I made a make-do sheetmetal brake out
of a vice. The bends in the aluminium didn't fit so I had to bend the pieces to get
them all to mostly fit. Hopefully, the aluminium panels will turn out ok in the end
and won't be seen under the carpet. It is almost like the didn't bend the panel
edges enough. It isn't really a big deal but fitting it all does take a lot of time.
I really was dreading the brake and fuel lines but so far I have them all bent and
installed onto the chassis without too much trouble. I haven't put the fittings onto
the end of the brake lines yet since I am trying to locate new fittings.
|
| May, 2001
(5-5-01) I installed the engine and tranny into the chassis. I began by bolting the
FMS A302 Heavy Duty Clutch to the billit flywheel on the SVO 351W. I then bolted the
World Class T-5 tranny w/bellhousing to the engine. It took a little pushing,
lifting, tilting, and cursing to get the assembly into the chassis. It is quite a
tight fit to bring the engine up high enough to clear the X-member and then have the tail
shaft on the tranny low enough to go under the transmission tunnel. Finally, we got
it in though. I decided to go with the Energy Suspension poly motor and transmission
mounts. A lot of guys are using the solid steel mounts without problems but it just
seems a little harsh to me. The factory convertable Mustang mounts are recommended
but the guys using them with this motor say the motor moves too much under load and causes
the sidepipes to hit the body. The poly set is fairly new but quite a few guys are
switching over so I though I would give them a shot. I am not really in a big hurry
at this point since it seems it is going to be a few more weeks until my 4-into-4 headers
arrive from FFR since they are still on backorder. I took the opportunity to order
remaining parts needed to start the engine like the starter, carb(backordered), throttle
cable, etc. I ordered all these items from Summit Racing since they sent me a 10%
off coupon. Those savings add up quick when you have to order a lot. Now if
they could just send me a coupon every couple of weeks I would be ok ;-).
(5-12-01) I continued to work on
little things still not complete, installed the master cylinder, started work on the pedal
box mods, installed the MSD box and coil, and got the tires mounted to the wheels.
Per CobraForum direction, I purchased a master cylinder for an '84 manual brake
Mustang. I installed it with the pedal box in stock form and it had too much preload
on the master cylinder. I consulted the CobraForum again after thinking through the
different approaches and they came through. I had hoped not to have to modify the
pedal box significantly since it would require welding, etc but I decided to just go ahead
and do it since it impacts the comfort and safety of the car. I decided to modify
the brake pedal as suggested on the NORCAL FFRORG website. I think it will be better
in the end but it will take me a little longer to get it completed. I had to order
a 5/16" heim joint and a long grade 8 bolt to match. I cut the head off of the
bolt and will use it as the brake pushrod. I drilled a pedal pivot hole in between
the factory upper(manual) and lower(power) mounting holes in the pedal box and also
located it about 3/4" back in the pedal box. In addition I had to drill a
hole
in the brake arm itself, located in line with the pushrod to ensure that it is not pushing
at an angle. The NORCAL site has great directions and pictures to use as a
guide. The real trick to this whole process was getting the factory installed brake
pushrod out of the mater cylinder. It is held in by a rubber bushing that fits
really tightly. I used some oil in the hole and just pulled, wiggled, and pulled
some more until finally it came out. The pedal box mods really eat up the time as
you keep fitting and testing. I opted to install the MSD 6AL ignition box on the
firewall, and the SS coil onto the top of the passenger's side footbox. I think this
will be an ok location and not be in the way of anything. The interior of the car
would have been a good choice too. Some have mounted them behind the dash without
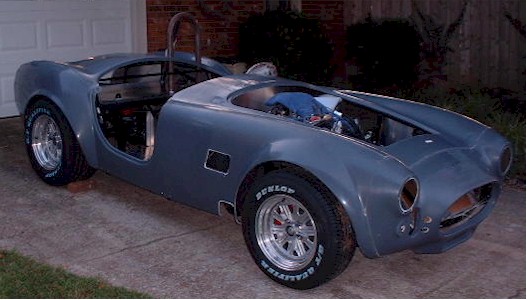
problems. I got the tires mounted and balanced on the wheels. The tires are
Dunlop GT Qualifiers with the sizes being 235/60-15 front and 295/50-15 rear. The
295/50-15 rears are not recommended due to clearance issues but they look really
cool. Dunlop's are actually about 1/10th of an inch or more narrower in section
width than other brands so hopefully that will help a little. I don't plan on
autocrossing with these tires so I don't think the sidewalls will be deflecting enough
under normal driving conditions to be a problem but who knows the way my luck is. I
mounted them on the car and can't see any clearance issues yet but I really won't know
until I mount the body.
|
| June, 2001
Well, I guess time flies when you are having fun. It is now
actually Jan. '02. I have been terrible at keeping the site up
to date since Summer hit. I will still post the updates on a
monthly basis to provide a timeline as best as possible.
The end of May
was a wash due to a wedding so I had hoped to make good progress
during June. I continued to prepare for the installation of the
engine by installing the fuel pump and regulator, and beginning to
work on the wiring. The wiring is a little intimidating but it
all comes together. Since I went the non-donor route my kit came
with the Painless Wiring kit which has all the wires labeled and
connected to the fuse panel. Don't let the name fool you though,
it is still a lot of work and it gets old quick. I spent a
little time on the wiring and then I would switch to something else
for a while. I managed to get most of the wiring connected this
month. I didn't worry too much about getting it tie strapped
together and wrapped yet, in case I have to re-route something.
That will come after it has all been tested. In addition to
wiring this month, I managed to get the engine set into place.
That is a milestone accomplishment. Now if I only had those
backordered headers I could fire that thing up.
For the end of
June, I decided to join up with quite a few other members of the
Cobraforum in Columbus, OH for the
Double Venom Spring Fling (DVSF). This started out as a
small get together that was mentioned on the forum and by the time it
was over it ended up being a rather large affair that raised ~$30,000
for charity. I was glad I took time off from the build to attend
the event. I got to meet many of the people that I knew from the
Cobraforum and check out roughly 120 different Cobra replicas and even
2 real ones. I got plenty of new ideas. There is now a
DVSF II planned for June 2?, 2002 so I would definitely try to attend
if you like these cars. I hope to be there with mine
completed.
Here are 3 groups of pictures that I took at the DVSF.
|
| July, 2001
Wow, July already. I started out the month by getting the dash
assembled and wired up temporarily. Yep, that's right...still
working on that wiring. I ordered a set of FMS aluminum single
groove engine pulleys and a March alternator bracket after searching
the forum to see what I needed. March sells a complete kit that
is very nice but quite pricey so I stuck with FMS. Once I received the pulleys I
discovered I needed a crank spacer in order to line up the
grooves. FMS also has those. As for the bracket, I was an
idiot not paying attention and ordered one for a 302 and not the
351W. Summit is great and exchanged it promptly. Once all
that was straightened out I just picked up an alternator from local
parts store and mounted everything up. Seems like it is going to
work fine. I also finally received my Griffin aluminum radiator
this month. Took a little longer than expected to get the
radiator since it was custom ordered without the filler neck but the
delay isn't a big deal because FFR still hadn't gotten me those headers. Once I received the radiator I bought some aluminum
stock to mount the electric fan to the back of the radiator. I
am going to try to run it without a shroud at first. I think
others have done it and haven't had problems. In order to mount
the radiator to the chassis I riveted a ~2in wide piece of aluminum
stock to the top of the radiator and then bolted through it and the
3/4" square tube radiator mounts that come pre-welded to the
chassis for the stock mount.
|
| August, 2001
Alabama in August. This is the time of year you wished you could
roll the car in to the den where it is cool. It was a little
warm in the garage. Especially when I fired the ol' hot rod
up. That's right, I finally started it for the first time.
Yep, put 2 and 2 together and you can figure out that FFR finally
shipped my headers. The only good thing about the whole ordeal
was that I was forced to spend time on other boring stuff like
completing the wiring, flaring the brake lines, and popping more
rivets. I placed an order and received my driveshaft from
Denny's Driveshaft Service. You can find there ad in the back of
most car enthusiast magazines. I purchased the driveshaft for
the Nova from them and it seems to be good quality so I stuck with
them. After finishing a few other things this month, I took the
go-cart down the driveway for it's first trip under it's own
power. Man, does it sound sweet through those side pipes.
I mounted them up temporarily to check the fit based on some comments
that were being posted on the forum about fitment problems.
Guess what, I seem to be fortunate enough to have the same problems
that most others are having. The passenger's side pipe seems to
fit ok but the driver's side sags quite a bit. The fix is to
either enlarge the holes or use smaller bolts. Once I get the
body mounted so that I can really judge height correctly, I will
probably try to use smaller grade 8 bolts to allow for some
adjustment.
|
| September, 2001
As with the end of May, the end of August and the first of September
was shot due to weddings. What has gotten into all these people
messing up my build. I guess that happens when you only have the
weekends to work on the build. I did manage to get the body set
on the chassis this month. At least now it looks like a
car. It wasn't too much trouble. I spent a good bit of
time though shifting the body around on the chassis, taking
measurements, and shifting some more. It seems to fit OK but
some of the factory drilled mounting holes need to be relocated,
header cutouts need to be enlarged, and door fitment is looking like
it will need quite a bit of work. I am also going to have to do
a little fine tuning of some of the 3/4inch tubing with a sledge
hammer ;-). Most of this was expected but it is still a pain.
So I guess
this about ends the rolling chassis phase and now I must start the
wonderful body work stage. This will require a lot of fitment,
sanding, grinding, filling, sanding, bitching, sanding. Did I
mention sanding? Yeah this is the stage that isn't very
motivating to say the least. I have never been a fan of bodywork
(mainly because I don't have the skill or patience) much less
fiberglass work. I called a few places to price having them do
all of the work but it is a little pricey so I hope to do the seam
work and fitment myself. Many people have done this type work on
the body buck but I think I am going to try something different.
I intend on covering the chassis with a plastic wrap and then fitting
the body back down over it. I hope that will help to minimize
the dust that gets on the completed chassis. I will also pre-fit
all the lights, trim, etc before I hand it off to the painter for
final prep work and paint. I will basically completely construct
the car and then take it back apart right before I turn it over to the
painter in order to minimize the risk of scratching or cracking the
paint while fitting trim items.
|
| October - December, 2001
Well, not much of an update here in regards to the build. It has
been a busy few months but the car had to take the back burner for a
while. Well, that and the fact that this stage of the build
probably isn't the most motivating of the stages. Anyway,
October was shot because of the implementation of a major project
requiring me to work weekends and stay in town. I took any extra
time and looked for a house since I was tired of only working on the
car on the weekends and driving 2 hours to get to it. OK, OK I
did sneak a little Vegas trip in the first of October. Cheap
rates! and I like deals. I was a Vegas virgin and I must say
that everyone should see it at least once. November was an
exciting month...I got engaged. Spent most weekends looking for
a house and finally found one. Yippee, no more driving 2 hours
to work on the car. The garage isn't what I call a shop but it
is better than what the apartment had....nothing. So by now I
guess you can figure out that December was spent moving. Just
doesn't seem like 3 months had already flown by and no progress on the
build. I don't like making New Year's resolutions but I got to
get this build finished before Spring hits!
|
| |
Factory Five Racing,
Chevrolet, Ford, Cobra, and Shelby are registered trademarks.
This site is in no way connected to any of the companies referenced.
Web Templates and Graphics |
|
|
 |
 |
 |
|
 |
|
 |
 |
 |
 |
|
|
|

|
|
|
|